The inspiration for this mobile started two years ago when another of my great nieces was born. I had made her this baby shawl, and when visiting, asked her mother if she needed anything else. The answer came back "a mobile". My niece had been trying to make one, but with a new baby she was having difficulty. So the conversation started about colours, and what she wanted on the mobile...... ........owls. I possibly would have done something different, but owls were, and still are, very poplar.
I needed inspiration, so hunted around on the net for owl pics. Of course there were heaps, I just had to pick one. Once I chose a pic, I had to work out fabrics and how it was actually going to be constructed, etc etc. I had fabrics of course, that was no drama, and working out the pattern for the construction of the owls was no big deal. The eye area and the chest pieces were to be appliquéd, but what about those half moon eyes, the beak, and the feet? They were all so tiny! I thought about using felt but how to apply? Glue is messy and I thought they would be too fiddly to hand stitch on. Then one day I had a brain wave that I could use my digitizing program and machine embroider them!
Digitizing is a whole different world, and these little eyes and beaks needed to be an exact size and spacing. It took me two attempts, the first one being slightly too big and slightly too far apart, but I eventually got there. Scanning my pattern and placing it as a backdrop in my digitizing program certainly helped. Thank goodness for testing first! I also digitized the eyes and beak in two different colours. This would stop the machine so I could put whatever colour I wanted in the needle.
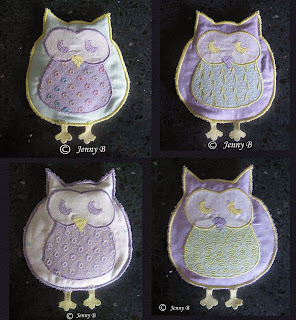
So once I had the eyes and beak sorted, I could make a start. The owls were going to be double sided and slightly padded, six hanging, so that made 12 owls total. I wanted them all the same, but all different, if that makes sense. So they were all the same shape , size and design, I just changed the colours around and put different designs on their chests.
The designs on the chest were just fancy machine stitches, stitches I very rarely use. I started playing to see what effects I could get if I mirrored or flipped the patterns. Yes, my sewing machine has this wonderful feature available. At first I had picked out sewing threads and machine embroidery threads in plain colours to match the fabrics, but then I dug out a variegated machine embroidery thread that I had dismissed previously and tried it on a sample. Why didn't I use this before? It looked so good!
One of the fabrics had a small pattern of circles on it. I had to be careful which machine stitch to use on it so that it enhanced the circles, not conflict with them. So I chose an eyelet that I found in amongst all the buttonholes. I think it worked well on the printed fabric.
Once the chest pieces were decorated, I could appliqué them to the background, appliqué the eye sections, then stitch out the eyes and beaks. At this stage they were still on squares of fabrics and they were screaming to be made into a quilt, but this was not the end purpose, so I soldiered on.
The owls were then carefully placed back to back with padding in between, so everything matched, then carefully stitched around the owl outline, and cut to shape. It was at this stage that I placed the feet . I had agonized over these feet the same as the eyes and beak. Once again I had thought of felt, but as the feet were hanging, I thought the felt may pull out, it was very tiny. So another brain wave said digitize! This time it was the feet outline, in a small stitch length, stitched onto two layers of fabric vlysafixed together. I felt that this would be stronger than felt. Once digitized, stitched and cut out, they were stitched onto the base of the owl, then satin stitched in place as I satin stitched the edges of the owls. Finito!
Well not quite. Once again I had agonized over how to hang them. My initial thought was dowel, painted to match, with tiny holes drilled to tie the owls to the dowel with fishing line. I wanted them to turn and swing, another problem to solve. DH to the rescue with his fishing and hardware knowledge.
I had found an old lampshade ring in my stash, so ended up padding it and covering it with matching fabric, This saved drilling holes in tiny pieces of dowel and messy painting. My part done, the rest was up to DH who supplied fishing swivels to let the owls spin, fishing line to hang, and the knowledge of how to tie knots so they didn't come undone.
This is a one of a kind mobile which is now entertaining is new owner. Would I make another one? Maybe, but it would have to be different. At least I now know about the uses of fishing swivels.


2 comments:
Really creative, Jen!!!
Oh yes, and kudos to DH for his help!!!
Post a Comment